| Do you have so many CDs that you don't know what
to do? Sometimes it seems that every Internet service provider sends me a new CD a week!
Until now I have tossed them out, but I was recently inspired by the wonderful
people on my favorite rubber stamping bulletin board (Gingerwood) to create
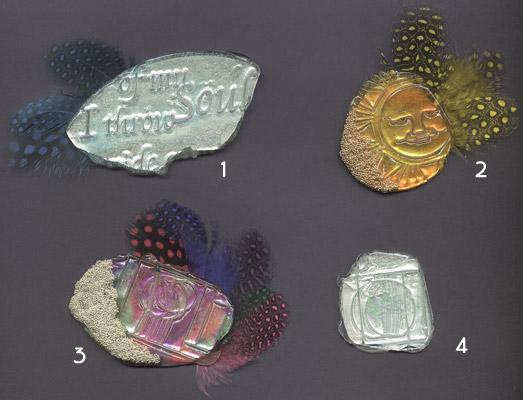
unique pins with them! Below are just a few of the samples I created (after a few trials
and errors!). Along the way, I discovered some tips that you might want to keep in mind. Note: The instructions below are for these pins—don't
let them hold you back from discovering your own technique for making fabulous CD pins!
Tips
- What kind of CDs can I use?
I discovered that you can use only commercially created CDs—that is, do not use
Read/Write CDs (the backing peels off when you cut them).
- How do I cut the CD?
You can use any scissors you use for regular household purposes (don't use your good paper
or fabric scissors!). I use inexpensive Japanese bonsai scissors.
- How can I prevent the CD plastic from
cracking?
When you hold your scissors, keep the blades at about a 45-degree angle (at least that
works for me).
An alternate way is to slightly heat the CD with your heat tool and cut.
- How do I make holes so I can add beads and
charms?
Use a drill with a small bit. Add holes after your pin is finished.
Supplies
- Commercially created CD (such as the AOL CDs you might have received in the mail)
- All-purpose household scissors
- Clear Ultra-Thick Embossing Enamel (UTEE)
- Holographic embossing powder (pin 1)
- Blue/green Pearl-Ex powder (pin 1)
- Clear embossing pad
- Heat tool
- Colored markers (pins 2 and 3) (I used Prismacolor
art markers)
- Very clean rubber stamp with a bold image
- Tiny gold and/or silver beads (pins 2 and 3)
- Clear Crystal Lacquer (pins 2 and 3)
- Feathers (pins 1, 2, and 3)
- Glue (I prefer Yes! glue)
- Acrylic spray
- Cardboard or cardstock (for backing)
- Pin back (I like the self-adhesive ones)
Instructions
- Holding your scissor blades at a 45-degree angle, carefully
cut the CD in half. Cut out your pin shape slowly, keeping the scissors at a 45-degree
angle. Don't try anything fancy—an amoebic blob is the best general shape.
To facilitate cutting the CD, heat it with your heat tool slightly.
(Thanks, joan, for the tip!)
- If you want to color the shape, do so now. You will be
working on the shiny side of the CD. A blend of several colors looks really lovely.
- Coat the shape with clear embossing pad (make sure
you coat the entire surface).
- Coat the shape with UTEE.
Note: I dump my UTEE into a bowl and dip my shape into the bowl.
- Heat well with heat tool.
- Immediately dip the shape into
the UTEE again (do not use the embossing pad again!).
- Repeat steps 5 and 6 until you have at least four
coats of UTEE on your shape.
Note: For pin 1 I added holographic powder and blue/green Pearl-Ex after the second
application of UTEE. This gives a nice depth to the piece.
- After the final coat of UTEE is heated,
immediately stamp into it with your stamp. Allow the piece to cool completely before
removing the stamp.
- At this point, you can embellish as you please.
For example, for pins 2 and 3, I adhered gold or silver Beedz with clear Crystal Lacquer,
and for pins 1, 2, and 3, I adhered colorful feathers to the back with Yes! glue. Be
creative!
Note: Before you add feathers or other "external" embellishments, coat your
pin with acrylic spray to protect it. Allow to dry completely.
- Cut a piece of card stock or cardboard slightly
smaller than the pin and adhere it to the back. Allow to dry.
- Add your pin back.
- Sign your masterpiece on the back!
Et voila! A work of art!
|